Hard Campaign Guide
Mission 33: Hot Pursuit
Difficulty:

Recommended Player COs: Kanbei, Drake, Grit
Enemy CO: Sturm
Perfect speed limit: 20 days
Use a team of Kanbei in the middle, Drake on the left and Grit on the right.
Notice that Sturm only has a pre-deployed force, just like in the NC
counterpart. So if you don’t want to have a really tough battle, don’t let him
capture ANY base at all. You need to defeat 5 units within one day to get a
perfect power score. Who gets to compete for power and technique on this
mission (as well as the next one) will be the CO who completes the mission
objective (ie. the one who finishes off the third Black Cannon). The CO I
suggest you do it with would be Grit, as he will be deploying more than enough
Artillery to deal with power, technique and the cannons.
Hot Pursuit looks like it’s going to be a lot of trouble. Many people have
found this to be the case. It’s certainly one of the toughest missions that
AW2’s Hard Campaign provides. However, thanks to donnyton, there exists a
strategy that makes this mission a joke compared to what it’s like without it.
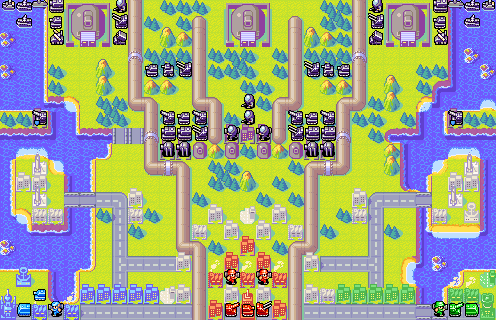
For this strategy, the idea is to completely block Sturm’s forces at the choke
point in between the two central minicannons, using Kanbei’s Tank. Notice how
Sturm always moves his Infantry and Mechs in the same pattern:
X = Minicannon
_ = Empty
I = Infantry
M = Mech
On day 2, it will look like this:
_MI
XMX
_I_
The next day, Sturm moves them into this formation:
XIX
_M_
_M_
___
_I_
And the bottom infantry is capturing the airport.
The Infantry between the minicannons is the key to locking the entriety of
Sturm’s forces. Once Sturm has moved his units in this formation, use your
A-Air to attack the northern Mech from the right. You need to be lucky for it
to destroy the Mech (95% attack), so save beforehand. When the Mech is
destroyed, use your Tank to attack the Infantry between the cannons. The
Infantry capturing the airport can be easily dealt with using your Artillery
and an Infantry that you produced on day 1. This Infantry should be destroyed,
so that the Mech will start capturing it instead. The next turn, the cannons
will have fired on the A-Air, bringing it down to 2 HP. Use your Artillery,
Infantry and the damaged A-Air to destroy the Mech, build some stuff (whatever
you deem necessary at this point) and wait for the next turn. Whatever you do,
DON’T attack the Infantry with your Tank yet!. On Sturm’s next turn, the Black
Cannon will shoot down the Tank to 5 HP. Now you can use it to attack the
Infantry and it should go down to 1 HP! The Tank will get hit again and also
get down to 1 HP, but the Infantry will not attack the Tank, not even when
Sturm uses his SCOP. It also can’t retreat due to Sturm’s own forces blocking
off its path. You have now effectively blocked off the entire middle section
with minimal effort. Keep the Tank in place, destroy the western and eastern
minicannons using Rockets (not the middle ones, obviously) and capture
everything you can reach. Kanbei’s only role then will be to produce more
expensive things than Grit, so that the Black Cannon will hit his units
instead of Grit’s.
Drake will be playing his own game on this map. There are only two things he
really needs to do. One is destroying the western Black Cannon using a Bomber.
Note that Drake’s Bomber will deal 66 damage to a pipe seam at full health.
Once the cannon fired on it, it will still have 5 HP left and deal 33 damage.
Add this up and you get 99 damage, just enough to destroy the cannon in two
hits! The second is to laungh the two missiles on the bulk of Sturm’s forces
in the center (conveniently blocked off if you’ve followed my strategy). This
will help Grit in achieving his power score as well as not getting as many
meteors on your roof. Two missiles on the middle section are enough. Combined
with Tsunami this will leave most of Sturm’s forces with 3 HP left. Leaving
them with fewer HP will cause them to start joining, making power score harder
to achieve.
With Drake, it is possible by rushing and careful positioning of your units to
capture the neutral base in the middle section of Drake’s area, just out of
Black Cannon range. Build an Infantry and an APC on day 1 and have it rush
towards the base. Drop the Mech off near the airport with your already
deployed APC and use both APCs, the Tank and a Recon that you need to build
from your eastern base to block off anything that can get to your capturing
Infantry. You can finish capturing just in time. Now you can deploy from there
instead of the bases near your HQ, which will get locked by the B-Ships. Don’t
attack the B-Ships under any circumstances. It’s not necessary to kill them
and doing so will only fill up Sturm’s power bar by gigantic amounts. Focus on
building a Bomber to destroy the cannon and enough units to deal with Sturm’s
ground forces.
For Grit, the situation is slightly different than Drake’s. Grit probably
won’t be able to take the northern neutral base just like Drake. However, it’s
enough just to take the one to his left instead and preventing Sturm from
capturing the base. Just like Drake, Grit should also try to fire his
missiles, but only two in total are really necessary. When you get to fire
them, you might want to spend them on the B-Ships annoying Grit, especially
when one tries to lock the western base.
Of course, the main unit to build for Grit will be Artillery. Masses and
masses of Artillery. You’ll want them to reach the middle section so that they
can help you get the power score. To destroy the eastern Black Cannon, you can
repeat Drake’s strategy and use a Bomber for it. The central you can try to
shoot with either Bombers or Artillery, but beware of Sturm’s forces that will
still be lingering around there. Once you get a lot of Artillery in range, you
can use your COP (or SCOP if you have it) to wipe out pretty much all of
Sturm’s forces. Kanbei can help even. Remember to use Kanbei primarily to draw
Black Cannon fire towards his units instead of Grit’s Artillery. Have Grit and
only Grit destroy the remaining Black Cannon as soon as power and technique
are safe.