Hard Campaign Guide
Mission 34: Final Front
Difficulty:

Recommended Player COs: Grit, Drake, Max
Enemy CO: Sturm
Perfect speed limit: 30 days
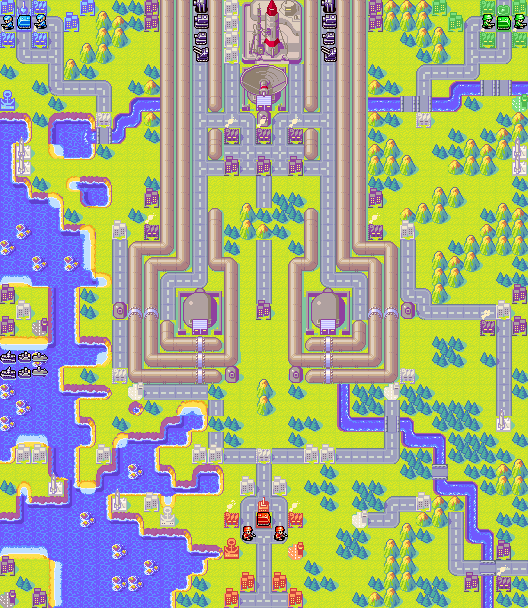
At last, the final battle! Your objective is clear: destroy the Deathray
within a 30-day limit. The map has changed since the NC version, making it
harder to reach the Deathray. Two Black Cannons, several Minicannons
(including one directly in front of the Deathray) and a bunch of pipes are
blocking your way to victory. Sturm won’t be defeated easily, that’s for sure!
You want to have Grit in the middle, Drake on the left and Max on the right.
All three COs have a different objective, just like in Hot Pursuit. Grit
should deal with the Black Cannons and hold out against Sturm’s force, Drake
defends against Sturm’s navy and uses his powers for support as well as
getting hit by meteors and Max goes off to blast the Deathray.
Grit is capable of destroying the Black Cannons pretty easily using his
Artillery. This is the most important reason of choosing Grit for the center
CO. He is the only one who can reach the cannons with nothing more than an
Artillery and still destroy them in two days only. He also can mass-produce
Artillery that will rip apart Sturm’s incoming forces. Start with capturing
nearby cities and more importantly, bases. There are some key locations Grit
should capture. Immediately head for the base just north of your starting
point. It’s much more important to have a third deployment location than to
first capture a city and then move towards the base. Also, you’ll want to load
the second infantry into the APC and send it northeast. On day 2, you can drop
off the Infantry in range of the eastern neutral airport, making you able to
capture it. The APC should then move three spaces east of the capturing
Infantry, so that it can carry the Infantry towards the eastern missile silo
once it’s done capturing. You’ll then be able to fire the missile before Sturm
can and nab an airport in the process!
Back at your main base, produce Infantry the first few days. You’ll want to
have the Infantries you build on day 1 moving west and east. The one west
should capture the city first, then fire the missile. You’ll want to fire all
missiles as soon as possible, as it will make your time against Sturm much
easier. On day 1, also build a T-Copter.
On day 2, build two more Infantry. The western one will go for the city that’s
immediately within its range. The second should enter the T-Copter (place it
just in range on day 2) and then move towards the southeast corner of the map.
Sturm has a base there which you can easily take. He’ll build an Artillery
there on day 1 and then nothing afterwards. Taking all this from him means
more funds to you and less to Sturm. 🙂
After this, it’s time to build Artillery to deal with Sturm’s units coming in
from the middle and the right. Place an Artillery right beneath the right
Black Cannon, so it can fire and destroy it in two hits. When the Deathray
fires (this will be on days 7, 14, 21 and 28), move out of the way, as it hits
you pretty hard (8HP!). Also try to destroy both the central minicannons and
the left Black Cannon. Use your powers wisely, it can be more useful to just
use your COP instead of your SCOP, as it gives the same firepower boost to
your units. Once the Black Cannons are down, Grit’s part in achieving victory
is pretty much done. You’ll have enough funds at your disposal to easily hold
back Sturm. You can probably have Grit take the second meteor as well. It’s
easier for Grit to build a large cluster of units at this point.
Drake has a lesser important, but invaluable role to play. He is the decoy CO.
The main thing you should do is getting hit. Drake will divert Sturm’s
attention away from Grit and especially Max. Distract the B-Ships to fire at
his units instead of going after Grit. Also, pack some big units together to
distract the meteor from Max’s bombers or Grit’s Artillery. Use your COP
whenever you get it. In the beginning, move towards the missile silos ASAP and
fire them at the pre-deployed force coming in from the middle. Also, make sure
to fire some on the incoming B-Ships. Capture the properties before the bridge
as well, especially Sturm’s cities in the corner. Once the left Black Cannon
is destroyed, you can march onwards and block Sturm’s base. If you did that,
your objective is complete. Don’t worry too much about it, though. It is
enough just to hold your ground with Drake. I’ve found that building 2
Infantry and an APC on day 1, then saving up for a Submarine really helps. The
Sub can take out the B-Ships (also fire two missiles on them total), giving
you room to breathe. Sturm will move his Cruisers and Subs towards Drake then,
but once you dive it, the AI will ignore it again.
Sturm will also have an airport on an island in the west. In some cases, Sturm
decides to be a bastard and move a Bomber towards Drake or a Fighter towards
Grit instead of massing all of his air units near his airport (thereby wasting
a tremendous amount of funds). While Grit can probably deal with the Fighter
easily enough, Drake can be struggling trying to fend off a Bomber. You might
want to restart if this happens, as it’s just bad luck.
Max will go for the Deathray, and with that also the power and technique
scores. You need to closely watch your units and prevent them from dying. As
Max will encounter the least amount of units, make sure you don’t destroy
everything at once, but leave some crippled units alive. You’ll need them for
your power score. When you start, first head for the missile silos and fire at
those middle pre-deployed force, as well as the B-Ships going for Drake. Once
you’ve fired all of the missiles, most of the middle units should be at 4 HP,
most importantly the Neotanks. Also, the B-Ships will both only have 4 HP
left. Then go capturing bases and cities. It can in some cases be possible to
capture the enemy base that’s located just in Black Cannon range. When Sturm
leaves it unattended, have an Infantry capture it while using the T-Copter it
came in as bait for the cannon. The copter should be hit, leaving the Infantry
free to capture it.
You need to build a Bomber fast to destroy the pipe seams blocking your way
towards the Deathray. Also build B-Copters to deal with the units Sturm will
build in the middle-eastern base. After a few B-Copters, build another Bomber
to support the first one. Try to calculate the number of units you’ll be able
to destroy in one turn and check if it’s enough. Most likely you will have to
destroy at least 7 in one day. Your COP will be more important than your SCOP
with Max as well. If Sturm decides to build A-Air from the south-eastern base,
try to lure them with Grit in his artillery range and kill them before they
could become a threat to Max. Once your power score is safe, kill the
minicannon guarding the Deathray, and the Deathray itself. Be sure to try to
manoeuver out of the range of the missiles and A-Air that might be guarding
the central area.