Hard Campaign Guide
Mission 8: Liberation
Difficulty:

Recommended Player CO: Max
Enemy CO: Flak
Perfect speed limit: 15 days
This mission is very tricky to get a 300 point S-Rank on. It requires a good
deal of luck to get the enemy move just right.
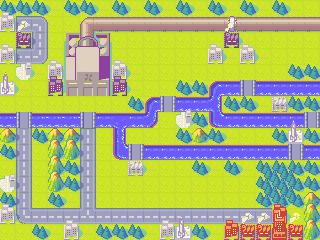
Flak is absolutely madly deploying units from his factory. It is impossible to
stand against his onslaught for very long with the low amount of funds that
are provided. So, what you have to do is sneak towards the pipe seam from the
right, capture the neutral base, build an MD tank from there and use it to
blow up the pipe seam by day 10. You really don’t want to drag it out much
longer, as Flak will really get on your nerves by then and will probably ruin
your chances of pulling off a win. This is even more important if you want to
achieve a perfect S-Rank on this mission. Taking much longer will most likely
be hurting your power score.
Flak will pretty randomly move his units in this map. Sometimes his units will
come straight for your main base (which is generally bad) and sometimes they
will move towards the pipe seam (which is generally worse). Most of the time,
however, his units will either move to the left side of the map, which makes
it a lot easier for you. In some cases he will even block his own factory
doors, effectively stopping certain units to be produced.
Now, on day 1, produce an APC from the eastern base and an Infantry from the
base west of it. Use the APC to transport this Infantry to the neutral base,
dropping it off two squares below the base, with the APC located on the
missile silo. Immediately when you have captured the base, produce an MD Tank
from it and try to destroy the seam with it. A Max MD Tank only needs two
hits for this. Use the APC to carry another Infantry west from the neutral
base and drop it off as close to the seam as possible. It can help out with d
ealing with the infantry there that will try to block the MD Tank’s path.
Also, Flak will probably build an Artillery from the base right below the
seam. If you send an Infantry unit in its range, it will attack that Infantry
instead of move so Flak can’t produce anything else from there. Use one of the
two missiles that you have at your disposal and the MD Tank to take it out.
The Infantry can block the base that turn so Flak can’t produce anything from
it again.
At your main base below there’s not much your units can do aside from
defending against whatever Flak sends your way. You can capture the neutral
city next to the missile silo to the west, but it’s useless to try to capture
anything else as that will get you too close to the factory or the bulk of
Flak’s army. Flak has a missile that he will launch at you just before you can
build the MD Tank. A Tank and one or two Infantry will probably be enough to
lure it to your main base and not hit anything important. As you’ll probably
need one missile to deal with that one Artillery, you have one missile left to
use. Use this one wisely, probably to help you gain a decent power score.
As for getting the power score right, it will entirely depend on how Flak
moves his units. Early on, he will probably start harassing your main base
with a recon, an A-Air, a tank, a B-Copter or a combination of these. Build
whatever is needed to repel this attack, mostly sticking to Mechs as they’re
cheap. Hopefully you can trap one of these units and keep it alive until you
can destroy three units in one day. Most likely this day will be the final day
when you blow up the pipe seam. You can build a couple of tanks from the
captured neutral base to destroy a few units Flak will eventually send towards
the seam. Between this front and the one near your HQ, as well as one
remaining missile, you should be able to pull it off. If you can’t, it’ll
probably mean that you have to restart the mission.
Alternatively, you can decide to use Sami for this mission and capture the
base directly below the pipe seam. Send an Artillery behind your APC on day 2
to destroy the pipe seam in a ridiculously short amount of time. Credits to
Dragon Fogel for pointing this out to me. However, I never really got the AI
to cooperate enough to let me get 300 points using this strategy. Don’t let
that bother you much, though, as this strategy is also confirmed to work. If
you don’t have any luck with Max, you might want to give this option a go.
Andy is definitely the worst choice for this map, as he has neither Sami’s
fast transports to get to the base below the seam in time or Max’s direct
combat power that really helps him in achieving 100 power. With nothing that
works in his advantage here, you really shouldn’t be using him.